Art is an excellent way to occupy kids, and it’s so flexible! We have run several Master Artist series. These are 6-week programs, but you can modify it however it works for you. Maybe you want to run a week of art, doing a new artist each day, or perhaps picking one per week, or even one per month is more your pace. Either way, art appreciation is always great exposure! This can be adapted for any age. You could even follow the same program year after year and watch them grow! Watch this space for more Master Artist ideas in the coming days and weeks.
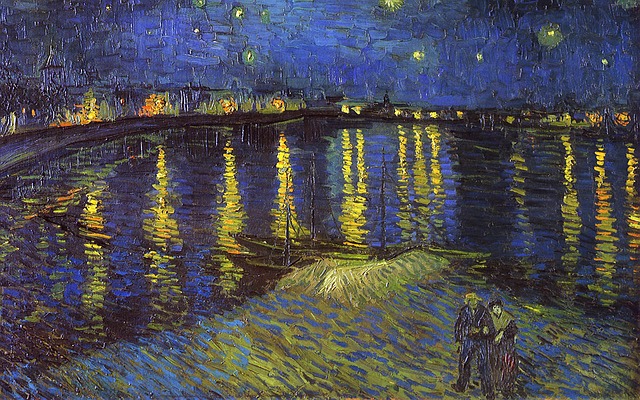
Vincent Van Gogh’s Starry Night

- Read: Katie and the Starry Night by James Mayhew is “A magical journey through five Van Gogh masterpieces.” I know this because it says so on the front cover.
- Look at some of his art, watch videos about his life, but please remember he had some mental health issues, so address this how you see fit.
- After observing the work of Van Gogh, try recreating Starry Night using chalk pastels. Begin by drawing shapes in the foreground, add the horizon line, then outline things that can add color, texture, and detail. Play with adding a variety of different hues of the same color to create depth and interest.
Claude Monet’s Bridge

- Read: Katie and the Waterlily Pond by James Mayhew explores five of Monet’s paintings.
- Try the crayon resist technique and fingerpaints to recreate Monet’s Bridge. Using white crayons against white paper, draw the bridge. With fluorescent, or whatever fingerpaints you choose, practice dabbing, blending, and overlapping color while making a fun mess. Maybe give the same image a try a few times to practice.
Henri Mattise: Drawing with Scissors

- Read Henri’s Scissors by Jeanette Winter to learn about the life of Mattise.
- Play with geometric shapes first. Using colorful, pre-cut geometric shapes and tissue paper, glue your design onto a dark background. Pay attention to background, foreground, and shapes being created out of other shapes and negative space.
- SCISSORS! Make sure a wide variety of colors, or even patterns of paper is available. Instead of focusing on geometric shapes, try creating more freeflowing forms. Holding your scissors still, try turning the paper to create designs. How does this change your work? Using the shapes you’ve created, including the negative spaces, glue onto your background to create a cohesive picture.